Last updated April 12th, 2024 at 04:01 pm
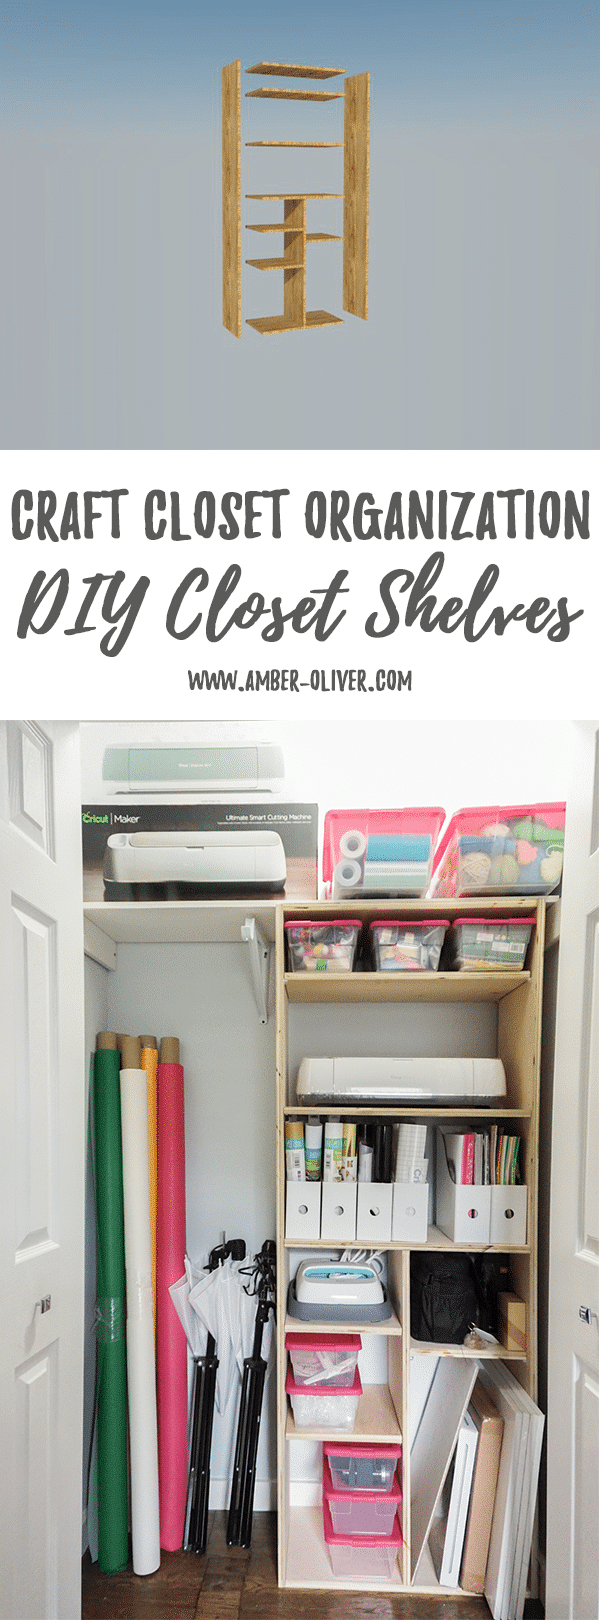
Learn how to build closet shelves to help utilize all the vertical space in a small closet. I show you the step-by-step tutorial I used to build DIY closet shelves for my craft closet organization.
Paging all craft supply hoarders! Whether you have an entire craft room or a small craft closet, it’s easy to let your craft supplies completely TAKE OVER! I desperately needed some craft closet organization so I built DIY closet shelves to help utilize ALL the space in the craft closet and really maximize my storage options. One of my goals for the DIY closet shelves were to make use of the vertical space in my craft closet since I only had one top shelf and the hanging rod. I was using it as well as I could by hanging stuff in bags from the closet rod and piling things in the bottom, but I had a LOT of wasted space.
BEFORE Craft Closet Organization:
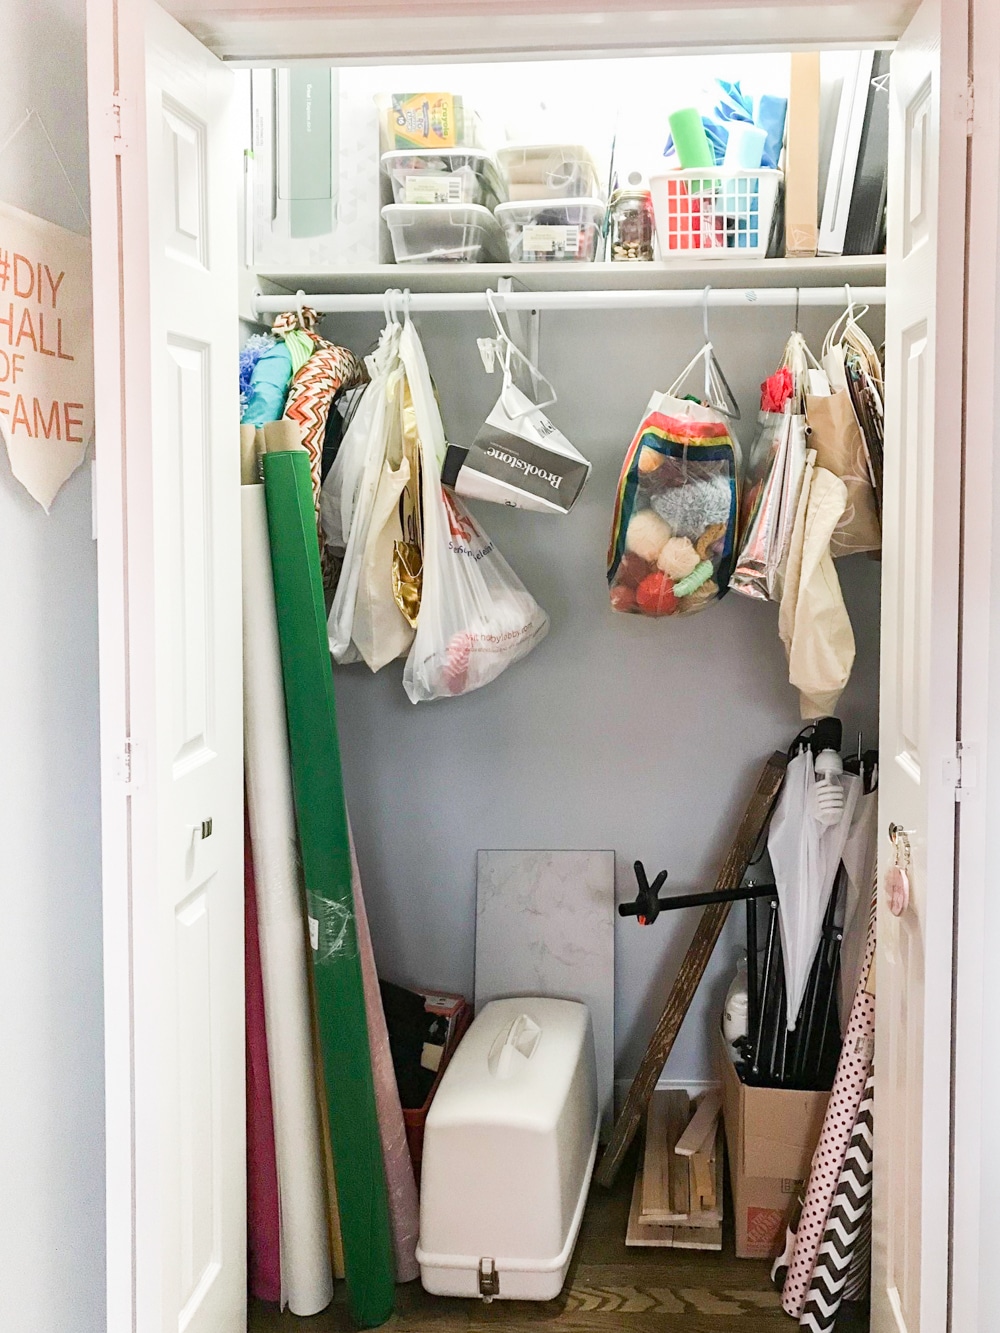
Not exactly the best use of space, right? I could have went out and bought a bookshelf from Walmart or IKEA but I wanted something STURDY and in a custom size so I didn’t have to move the top shelf! I also wanted to keep at least half of the closet space for hanging space. At this time, I don’t really need it but in the future this room will most likely be a nursery/kids room, in which case we’d want at least a little hanging space. Also, if we sell our house I think most people prefer to have some space to hang things. I was able to get some craft closet organization thanks to these DIY closet shelves!
DIY Closet Shelves
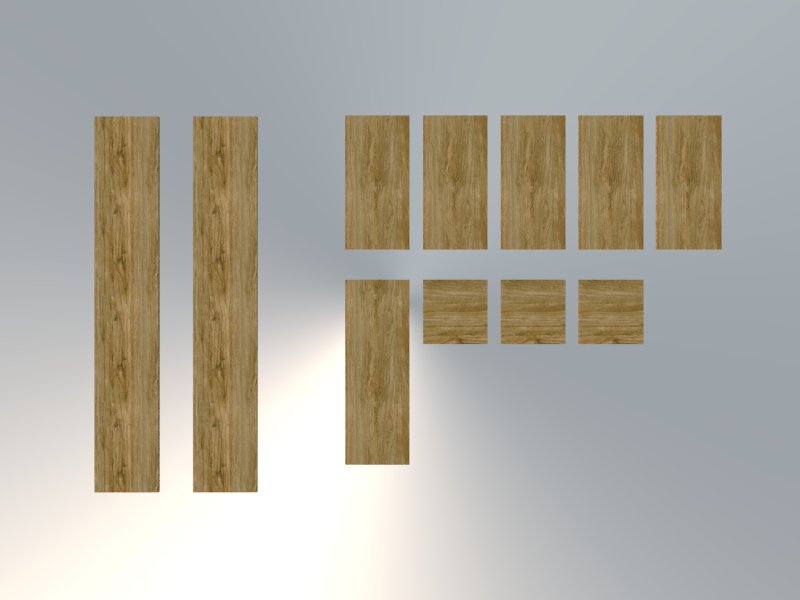
The biggest tip I can give you for this project is to have your plywood sheets ripped down in the store! Most hardware stores will do up to 10 cuts for you FOR FREE! Come prepared with this diagram to make the process quick and easy! This will save you a lot of time and trouble at home, especially if you don’t have a table saw!
How to Build Closet Shelves
Materials
Tools
- Kreg Jig Pocket Hole Jig
- Corner Clamps
- Drill
- Circular Saw
- Kreg Rip-Cut
- Kreg Shelf Pin Jig
- Tape Measure
- Wood glue
Instructions
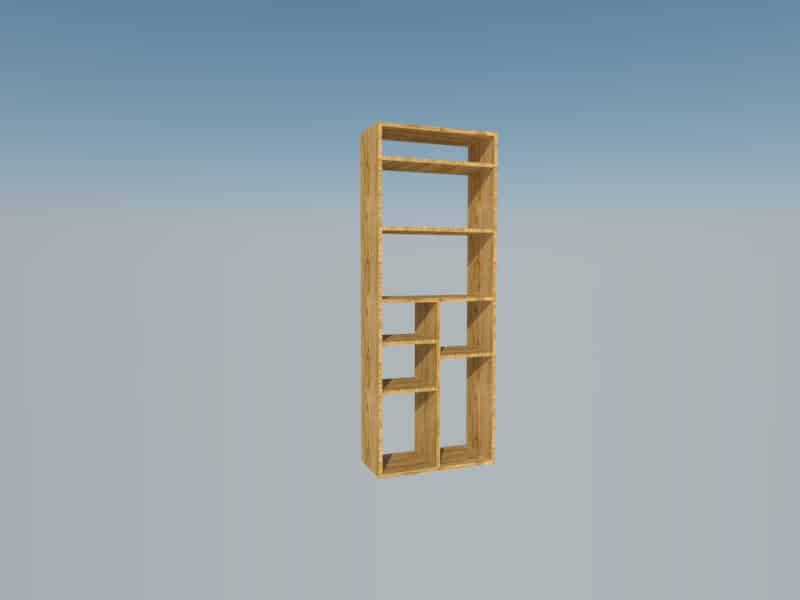
- Once you get all your pieces home, you have a lot of pocket holes to drill! This is easy to do with a Kreg Jig Pocket Hole Jig. Drill your holes on the short ends of each of the shelves – these will be used to attach into the tall vertical side pieces.
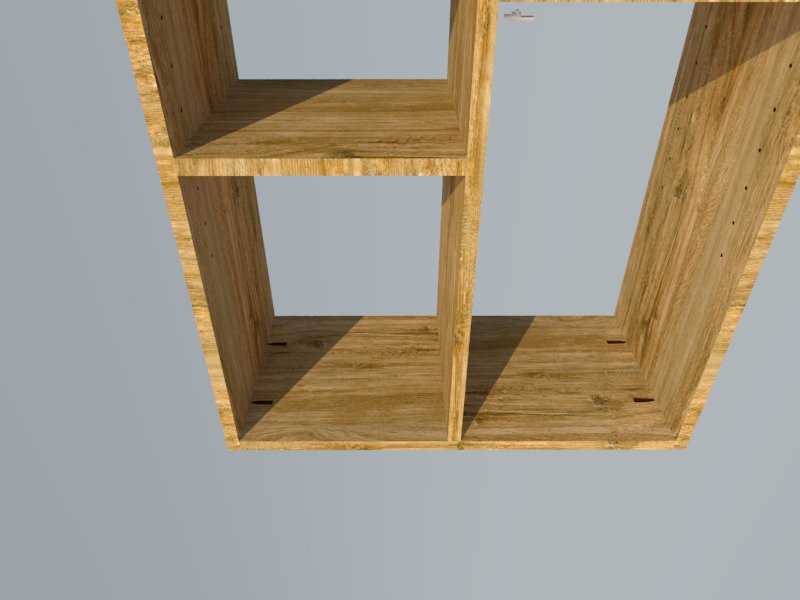
- After you finish the first step, measure and mark the center on one of your shelf boards. This piece will be a sort of anchor in the middle of your shelving unit. After you’ve marked the center, you can assemble the “I” at the bottom of your shelves. This uses the bottom piece and the middle and will give your shelves stability. Make sure you put your pocket holes on the side that will face the wall so you won’t see them from outside the closet. You’ll attach the vertical piece into middle of the bottom shelf board and middle pieces. You’ll need clamps or an extra set of hands to help hold the board in place. Use wood glue on those joints t o help give strength.
- Attach the “I” into your two vertical pieces on the sides. The corner clamps really come in handy for this part! They’ll hold the two pieces together so you can drill them together.

- Repeat step 3 to attach the top board – make sure you put your pocket holes on the TOP of the shelf so they can’t be seen underneath.
- This is the only cutting you should have to do. Measure then cut the small shelves for the bottom section of your shelving unit. I don’t have a table saw, and my miter saw is too small, so I used a cordless circular saw the the Kreg Rip cut attachment for this step. Clamp your board in place and go!
- To insert the shelves, I used the Kreg Shelf Pin Jig. This thing is so handy! Use the included drill bit and hardware to drill holes all the way up the front and back of your DIY closet shelves. I opted for shelf pins instead of attaching the shelves to the unit so that the shelves are adjustable!
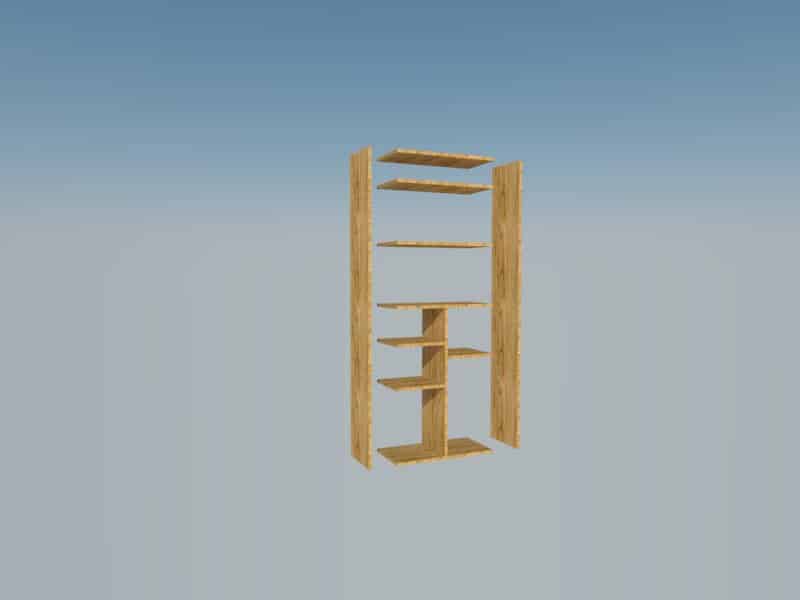
Click here to see measurements for these DIY closet shelves and get the cut list!
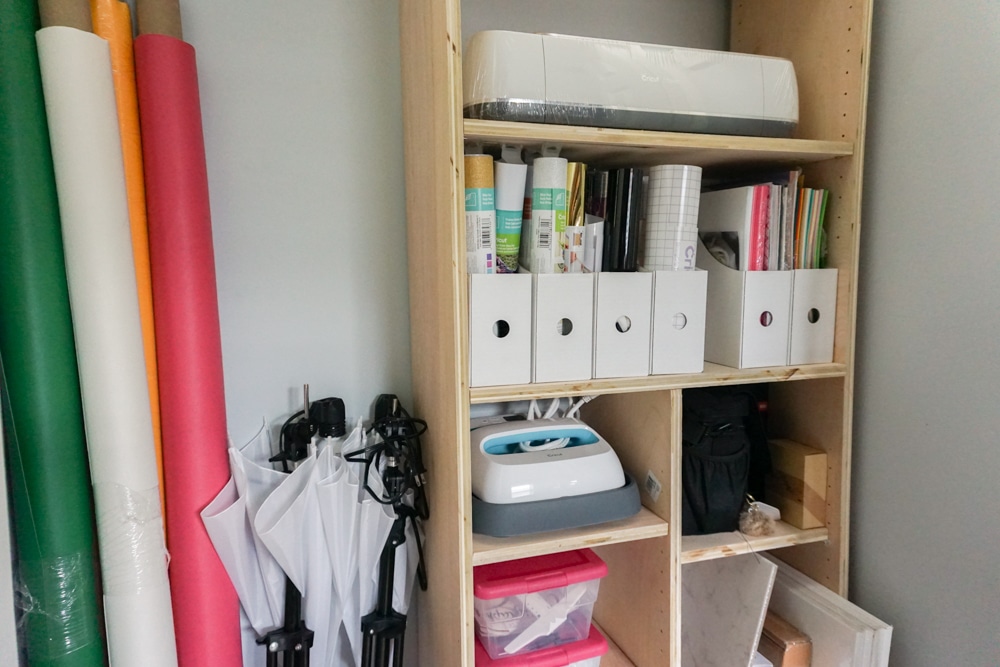
Once your unit is built, it’s time to put into place! (You could also paint at this step if you’d like.) Remove the old hanging hardware, and put your new shelves in place. I made mine the perfect height so the existing shelf would fit nicely right over top. I also cut the bar so it would fit nicely right beside the new shelf.
We don’t have kiddos in our house and with the place it’s positioned, I don’t think there’s much chance of this being pulled over. That being said, it’s always a good idea to err on the side of caution. That means when installing this custom closet organizer, use a stud finder and attach to the closets back wall or the wall on the side of the closet.
How to Build Closet Shelves
Once the unit is in place, it’s time to put in the shelf pins and shelves! These slip right in the holes you drilled and make a perfect perch for the shelves. The adjustable shelves come in really handy because sometimes your needs change. You may start out using them as shoe shelves and then later need to adjust to accommodate your newest organizing bins from the Container Store!

This DIY project could easily fit in a variety of places in your home. Maybe you need closet shelves in your linen closet or guest room? Add these in your master closet or anywhere else in your home you need more vertical storage space! These easy closet shelves work perfectly in a basic reach-in closet.
The tools I have listed in the tutorial are what we used to complete this project. Having all of these aren’t completely necessary but the definitely make the job easier. If you don’t have the Kreg rip-cut for example you can always use a straight edge and a circular saw. We did many projects like that before finding the Rip-cut. If you have a table saw, obviously that’s the best way to cut these! Just know that even if you don’t have have a garage full of tools, you can can still create some pretty awesome things! Especially something like these simple shelves!
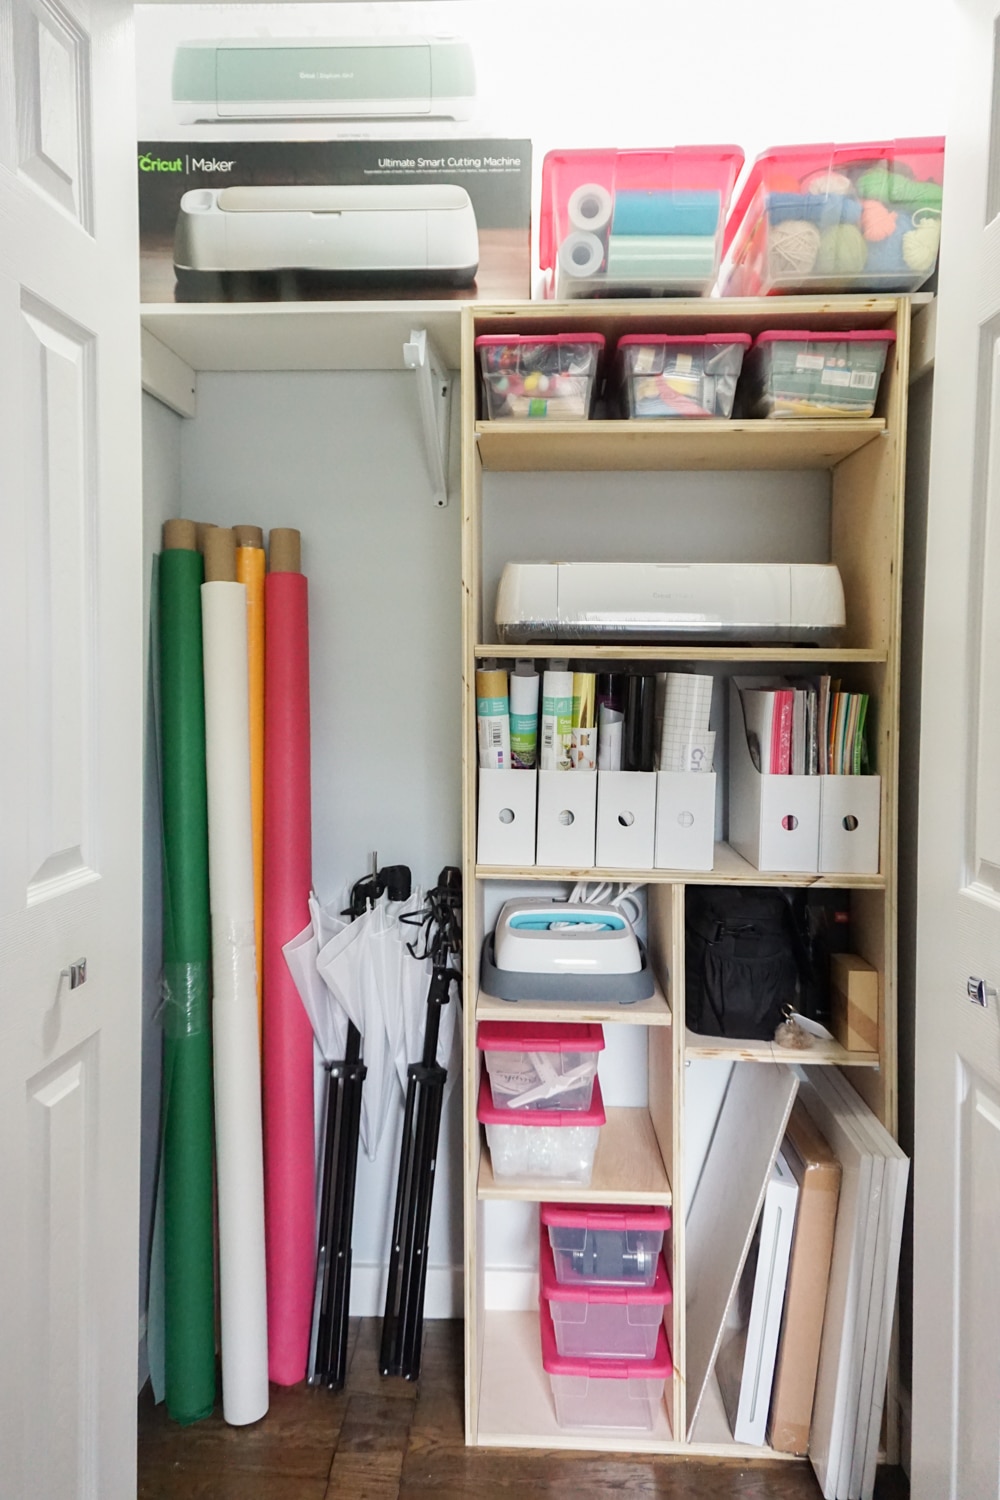
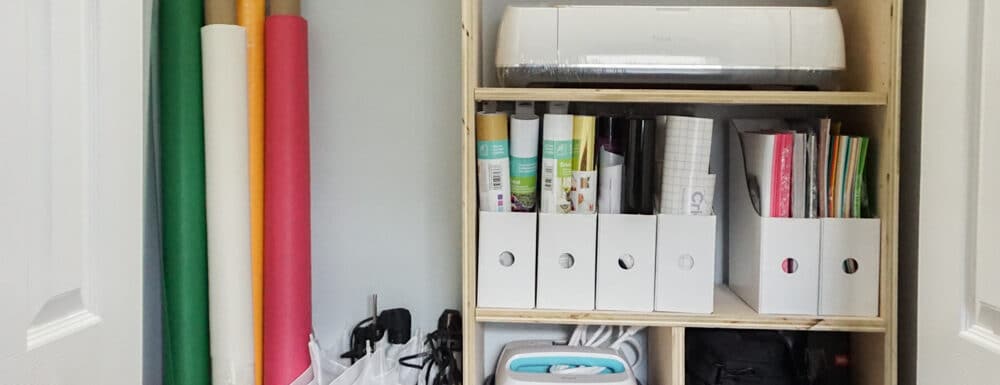
I now have space for all my crafting supplies! It’s a great home for my Cricut machine and all my Cricut supplies. Wanna see the rest of my craft room/home office? I did a huge makeover a while back and spoiler: it includes the coolest DIY fabric wall! You can see all the details (and photos!) here!
Since building these simple DIY closet shelves I’ve learned even more about woodworking and would do a few things differently next time! For one, I would use edge banding to give it a more finished look. Of course, the type of materials you use also depends on your budget. So my advice is to do the best you can with whatever you’ve got! This gives you a great general idea and a DIY tutorial you can use as a starting point to get yourself an organized closet!
Don’t forget to PIN for later!
Love a good closet makeover? Check out the complete closet makeover in our primary bedroom! My dream closet would be a lot bigger but I’m in LOVE with my new DIY closet system that made the most of the walk-in closet for our bedroom.
Shop for this project:


ORGANIZATION ARCHIVES
View our collection of organization tips and tricks!
Diogo says
This is a great idea and what a big improvement! My question is: I don’t like the way the pocket holes look like once everything is assembled. Did you plug them or simply hide them? I can’t seem to see any in your pictures.
Amber Oliver says
I made sure they were all on the undersides or flipped the other way so you can’t see them 🙂