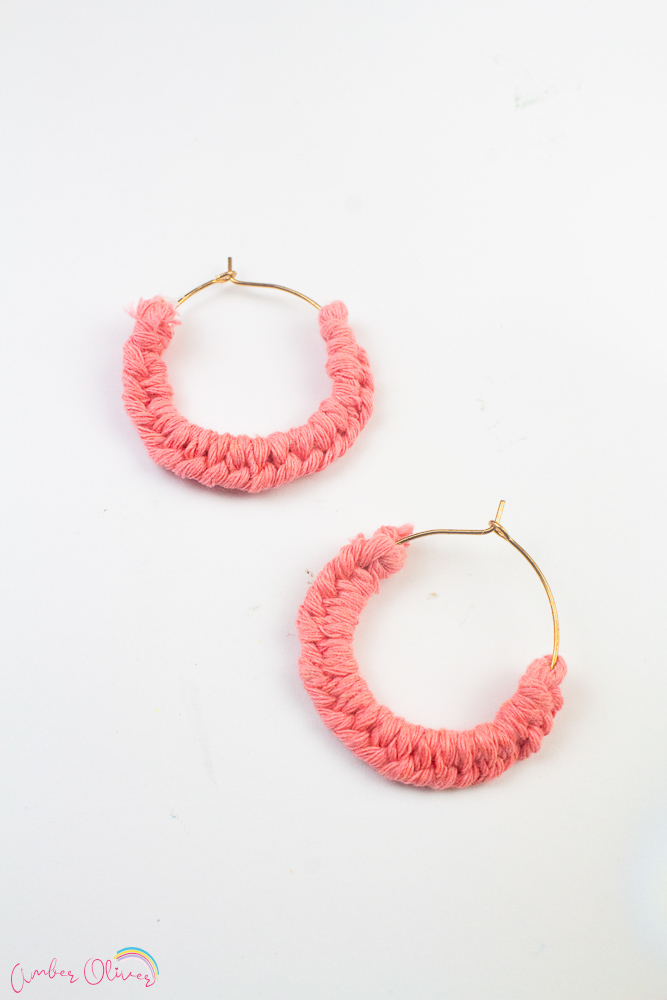
Looking to add a handmade touch to your jewelry collection? DIY macrame earrings are the perfect way to create stylish, one-of-a-kind accessories that showcase your creativity and personal style.
If you’re on the hunt for a fun and creative project, look no further—DIY macrame earrings are the perfect way to add a handmade touch to your jewelry collection. With just a few simple supplies and some basic knots, you can create beautiful, one-of-a-kind earrings that are sure to impress.
Whether you’re a seasoned macrame artist or a complete beginner, this guide will walk you through the steps to make your own macrame earrings. Plus, I’ll share some tips and tricks to help you get the best results. I’ve also included a video tutorial to guide you along the way!

Why DIY Macrame Earrings?
Macrame earrings are not only trendy, but they also make great gifts. Imagine giving a friend or loved one a pair of earrings you made yourself—talk about a thoughtful and unique present! Plus, these earrings are a great accessory to have in your wardrobe because they’re lightweight, stylish, and can be customized in endless ways. You can experiment with different colors, shapes, and patterns, making each pair truly unique.

What You’ll Need for this Macrame Earrings DIY:
To get started, you’ll need a few basic materials:
- Cotton macrame cord or crochet cotton: This will be the main material for your earrings. For beginners, I recommend starting with a thinner cord to make delicate designs.
- Hoop earring: The foundation of your earrings. You can choose from different shapes like round hoops, fishtail earring hoops, or even earring hoops in a different shape.
- Earring findings: These include jump rings, earring hooks, and seed beads if you want to add extra flair.
- Pair of scissors: Essential for cutting your cords to the right length.
- Wire comb: Useful for brushing out the ends of your macrame to create a fluffy, full look.
- Lighter: To seal the ends of your cords and prevent fraying.
- Optional: Embroidery floss for adding color accents, macrame earring patterns for inspiration, and additional items like a diy macrame earring kit that includes everything you need.
Preparing Your Materials
The first step in any macrame project is to prepare your materials. Start by cutting your cotton macrame cord into even length pieces. The length of the cord will depend on the size of your earring hoop and the design you want to create. For most designs, you’ll want to cut your cords a little longer than you think you’ll need to allow for knotting and trimming.
Macrame Earrings DIY Video
Let’s Get Knotting: The Basics
Now that your materials are ready, it’s time to start knotting! If you’re new to macrame, don’t worry—I’ll guide you through some basic knots that are easy to learn and will give your earrings a professional look.
- Lark’s head knot: This is one of the most common macrame knots and is perfect for attaching your cord to the hoop earring. To make a lark’s head knot, fold your cord in half and place the loop over your hoop. Pull the ends of the cord through the first loop and tighten.
- Square knot: The square knot is another essential macrame technique. Start by dividing your cords into two groups: the center cord (which will remain stationary) and the working cords. Cross the left working cord over the center cord and then under the right working cord. Bring the right working cord under the center cord and up through the loop on the left. Pull tight to create your knot.
- Double half hitch knot: This knot is perfect for creating patterns and adding texture to your earrings. To make a double half hitch knot, take your working cord and wrap it around the anchor cord (the cord you’re knotting onto) twice. Pull tight after each wrap to secure the knot.
- Spiral knot: The spiral knot is similar to the square knot but creates a twist as you continue knotting. It’s a great way to add a different shape and texture to your earrings.
- Crown knot: For a more intricate design, try the crown knot. This knot is a little more advanced but adds a beautiful, decorative touch to your macrame earrings.

Creating Your Macrame Earrings:
- Attach your cords: Using the lark’s head knot, attach your cords to the earring hoop. Make sure the cords are securely fastened and of even length. You can also Insert the rope through the hoop— just halfway making two strings. (string A- left side & string B- right side).
- Start knotting: Begin with a square knot to anchor your design. Then, depending on the look you’re going for, you can incorporate a mix of spiral knots, double half hitch knots, and crown knots.
- Add decorative elements: If you’re feeling creative, this is the time to add seed beads or use embroidery floss to add pops of color.
- Trim and seal the ends: Once you’ve finished your design, trim any excess cords to your desired length. Use a lighter to carefully burn the ends of the cords to prevent fraying. For a fluffy look, use a wire comb to brush out the twisted strands of the cord.
- Attach the earring findings: Use jump rings to attach the earring hook to your macramé earrings. Make sure everything is securely fastened.
- Final step: Admire your work! You’ve just created a beautiful pair of macrame earrings.
Macrame Earrings DIY

Looking to add a handmade touch to your jewelry collection? DIY macrame earrings are the perfect way to create stylish, one-of-a-kind accessories that showcase your creativity and personal style.
Materials
- Macrame Rope
- Hoops
- Scissor
- Lighter
Instructions
- Cut the macrame rope, just enough length for your hoops.
- Insert the rope through the hoop— just halfway making two strings. (string A- left side & string B- right side).
- Place string A over string B and pull it from under all the way to the right side, and
tighten. - Repeat the same procedure all the way through until the hoop is covered.
- Cut the ends and burn them neatly with a lighter.
Notes
This can be difficult to understand via photos! Please use the video tutorial for better understanding!
Tips for Success
- Work on a flat surface to keep your cords organized and prevent tangling.
- If you’re using a diy kit, follow the instructions carefully and don’t hesitate to refer to the video tutorial for guidance.
- Experiment with different types of earrings and macrame patterns to find your favorite style.

Creating your own diy macrame earrings is a great way to explore your creativity and make something beautiful with your own two hands. With a little practice, you’ll be whipping up pairs of earrings in no time, and who knows—you might even start making them as great gifts for your friends and family. So grab your diy kit, gather your materials, and start knotting your way to a gorgeous new pair of earrings.


Leave a Reply