

Last updated May 19th, 2025 at 12:03 pm
Installing a farmhouse kitchen sink can transform your kitchen into a functional and stylish space. I’ll walk you through the steps to successfully installing your new farmhouse sink, with tips and tricks from our own DIY experience.
During our home renovation and addition, one of the most exciting (and challenging!) upgrades was installing a farmhouse kitchen sink. We spent several weeks without plumbing in the kitchen, so finally getting this beauty in place felt like a huge win. If you’re considering this iconic sink style, I’m sharing exactly how we tackled it. Here’s everything you need to know to install your own, and trust me—it’s easier than you might think!
Preparation for Installing our Farmhouse Sink
Necessary Tools
Before diving into the installation, here are the necessary tools you’ll need:
- Circular saw (for cutting the cabinet front if needed)
- Tape measure (to ensure proper measurements)
- Drill (to secure the sink and supports)
- Level (to make sure the sink is level)
- Silicone caulk (to seal the sink and prevent water leaks)
- Brackets or a 2×4 (for support underneath)
Measuring the Cabinet and Sink
When it comes to installing your farmhouse sink, precise measurements are crucial. For us, installing the farm sink was a little easier because our original cabinet was broken by the contractors. We ended up purchasing a cabinet designed specifically for a farmhouse sink, like this one: Farmhouse Sink Cabinet. This made the installation much easier, but we still had to install additional supports on the sides to help the sink rest securely in place.

If you’re working with an existing cabinet, don’t worry! You can cut the cabinet front to accommodate your apron-front sink. Most cabinets have a faux drawer, and you can easily modify the cabinet face. Just make sure the depth of the sink doesn’t extend past the top of your cabinet doors, or you may need to go with a shallow sink. This is a crucial step because you don’t want your sink to interfere with your existing countertops or cabinetry.

Here’s a great tutorial using a more shallow farm sink: Installing a farmhouse sink in existing cabinet
Here’s how to modify your cabinet doors to accommodate your new sink: Resize Your Existing Cabinet and Doors to Fit an Apron Front Sink
Removing the Old Sink
If you have an existing sink, the first step is to remove it. This means disconnecting your garbage disposal and any plumbing fixtures attached to the sink. If you’re replacing an undermount sink or a standard kitchen sink, you may need to carefully detach it to avoid damaging your countertop. You may also need to measure and cut your countertops to fit your new sink. This can be DIYd with the right tools, but I’d call a professional if it were me. Our counters were way to expensive for me to mess with.

While installing our new sink, we had to clear out the cabinet area. This is when we noticed the low placement of our new farmhouse sink (which is quite deep), and how it would impact the space under the cabinet. The next step was to adjust the support structure in the cabinet to accommodate the weight of the new sink.
Installing the New Sink
We chose a DeerValley workstation single-basin farmhouse sink, which is crafted from porcelain and resists chipping and cracking over time. You can see the sink here: Farmhouse Sink. The single basin offers uninterrupted space for washing, stacking dishes, and other household tasks. One of my favorite features of this sink is the bottom grid, which helps keep dishes from chipping or breaking by elevating them and making it easy to rinse underneath.

The apron front of this sink makes a striking visual impact, and the modern flat baffle front gives it a sleek and elegant appearance. It’s also designed for a farmhouse-style installation, which means there’s no exposed mounting platform to hide. If you’re considering a stainless steel sink or a more traditional farm sink, the installation may look slightly different, but the process is similar.
Installing the Sink and Securing It
When installing the sink, we didn’t need to attach it to the cabinet—it essentially drops in and rests securely on the support frame. Since our sink is heavy, we used a 2×4 and screwed directly into the cabinet for added support. The weight of the sink is something to consider because a standard base cabinet might not be built to hold the heavy load of a fireclay farmhouse sink.

Ensure the sink is level by using a level tool and shim it if necessary to avoid any drainage issues later on. Once it’s in place, run a bead of silicone caulk around the rim of the sink to create a waterproof seal between the sink and the countertop.
Plumbing Setup under Farmhouse Sink
Here’s where things got a bit tricky for us: since the sink sits low and is very deep, the space underneath the cabinet became tight, and reconnecting the plumbing fixtures (like the garbage disposal and water lines) was more challenging.

Because of the size of the sink, there’s limited space under the cabinet to work with, so I highly recommend considering professional help for the plumbing connections.
If you’re not experienced, this part can be frustrating, and a plumber will ensure everything is properly connected and sealed to prevent leaks. We got it done ourselves with lots of YouTube tutorials but for a few hundred bucks you can save yourself the effort.

Once the sink drain hole is connected to the plumbing system, ensure that everything is waterproofed and tightly sealed to prevent leaks. This involves a lot of back and forth turning the water on and off outside at the main.
Adding the Finishing Touches
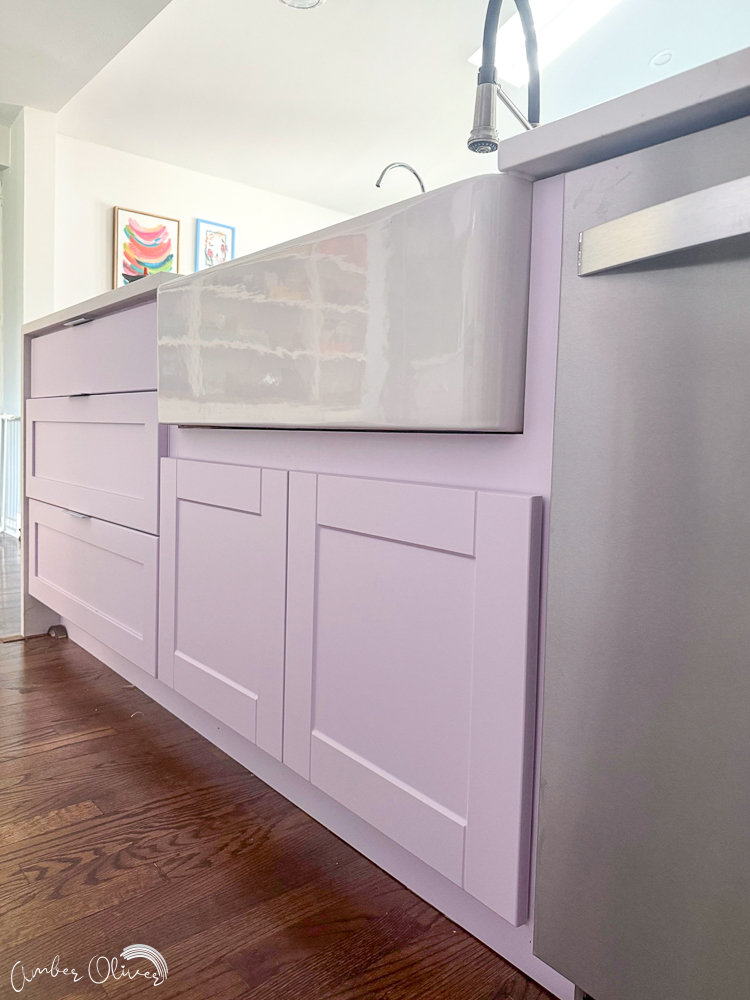
After the sink was secured, I installed a trim board around the base cabinet of the sink for a finished look. We had our kitchen cabinets painted shortly after this and I LOVE how the sink looks with our lavender painted cabinets!
How to Maintain Your New Sink
One of the best things about the our farmhouse sink is how easy it is to maintain. It’s designed with a porcelain glaze that resists stains and scratches. The sink protection mesh (the bottom grid) not only protects the bottom of the sink from knocks and scratches but also allows water to flow freely, ensuring that cleanup is a breeze. This is one of my favorite features. Just clean your sink regularly with a soft cloth, and avoid harsh, abrasive cleaners.
Since we painted our kitchen cabinets lavender, the white farmhouse sink looks amazing with the bold cabinet color. It adds such a vibrant and lively touch, and I definitely recommend pairing a white sink with colored cabinets. Initially, our cabinets were white, and the sink looked pretty bland. But with the lavender cabinets, the contrast is perfect. The sink truly becomes the focal point of the kitchen, adding character and charm!

Installing a farmhouse kitchen sink is a super rewarding DIY project you can do for your home. Our experience was made easier with the right products, like the DeerValley sink and a cabinet designed for this installation. With a little planning and patience, you can have your own dream kitchen with a beautiful and functional farmhouse sink.
Would I do it again? Absolutely! The finished look is incredible, and every time I use the sink, it feels like the heart of the kitchen. If you’re ready to take on this project, don’t hesitate to dive in—and if you get stuck, remember there are professionals who can help with the tricky parts.
Our Home Addition
We are building a living room add on and remodeling the kitchen at the same time.

Introduction
It’s finally time to share the details of our our home addition!

Foundation
We had a brand new foundation poured for our living room home addition!

Framing
After the foundation was poured, the next step in our home addition was the framing! Here’s the process of framing to have a new room added to your home.

Interior and Exterior Finishes
After our living room home addition was framed, it was time to begin the interior and exterior finishes. Next up was the installation of insulation and drywall, painting the walls, then installing hardwood flooring and baseboards!

DIY ARCHIVES
View our collection of DIY projects!


Leave a Reply