Last updated September 1st, 2024 at 02:25 pm
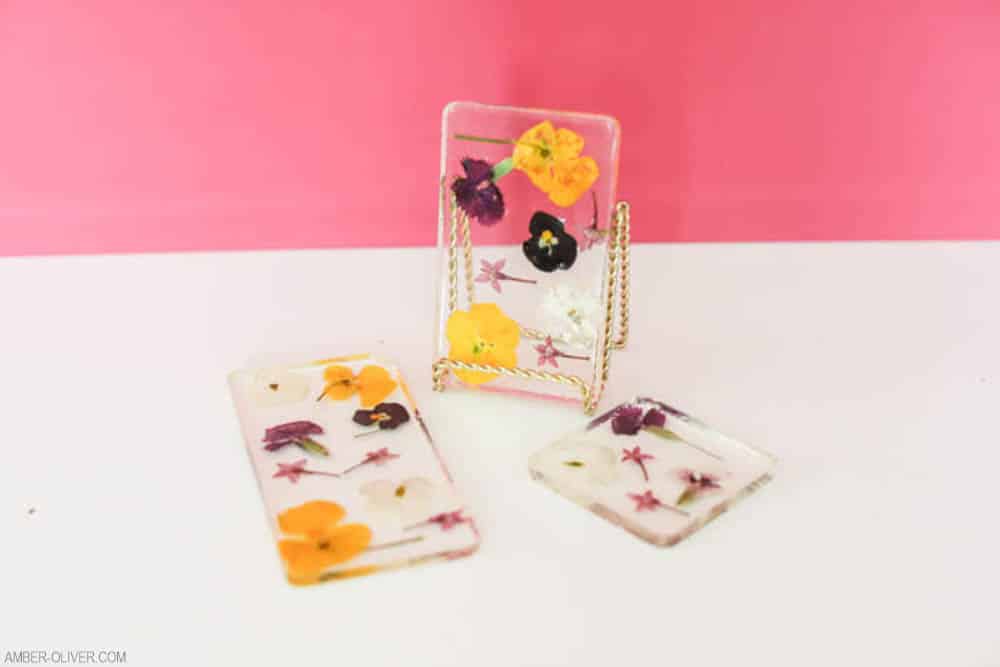
Wondering what to do with pressed flowers and can you put dried flowers in resin? Learn how to preserve dried flowers in resin with this simple tutorial!
We get flowers for a variety of reasons: birthdays, anniversaries, happy reasons, and sad reasons. No matter why, we usually want to make them last forever. The best way I’ve found to do this is to press them and then preserve the dried flowers in resin.
Why Choose Resin for Flower Preservation?
Resin is incredibly simple to use and the perfect way to preserve flowers. The two-part epoxy mixes up in less than 5 minutes and usually sets in about 24 hours. There are a variety of molds available in different sizes and shapes, so you can customize your beautiful design however you want! Whether you’re making resin jewelry, coasters, or decorative pieces, the versatility of resin makes it the best choice for many art projects.
Pro Tip: When working with real flowers, it’s important to make sure they are fully dried before embedding them in resin. Any moisture left in the flowers can cause issues like mold or discoloration. Using a drying method like silica gel can help preserve the natural beauty and shape of the flowers.

What to do with pressed flowers:
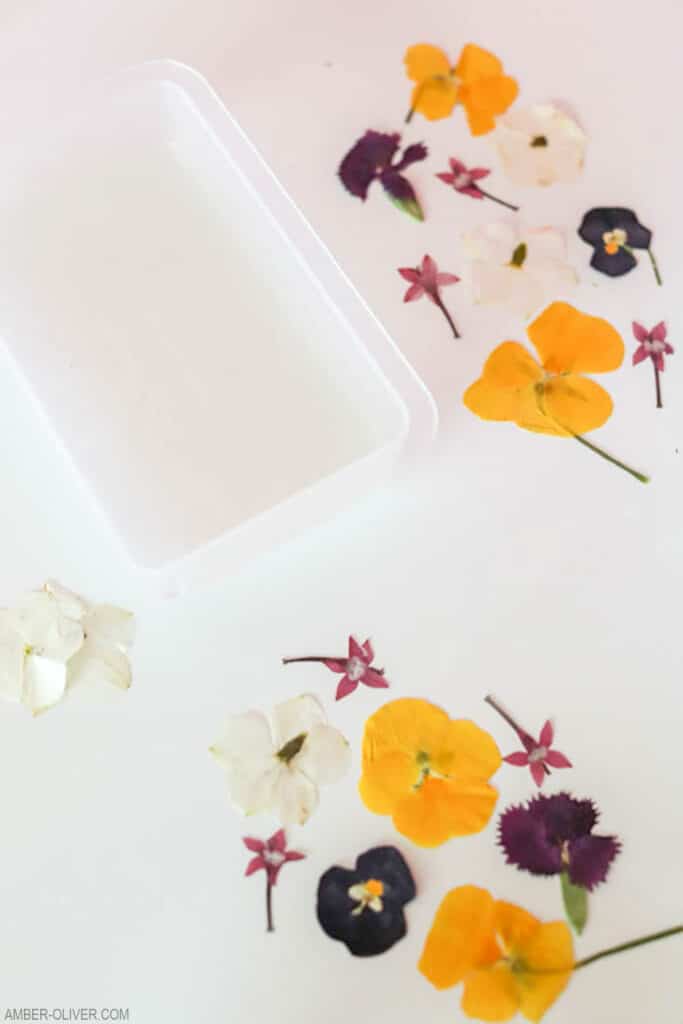
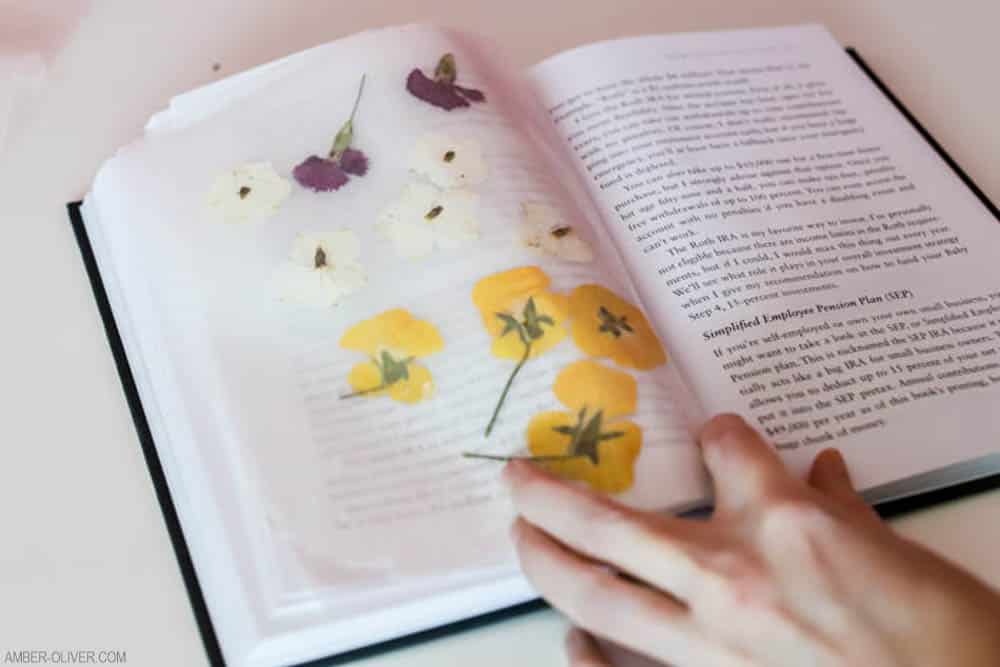
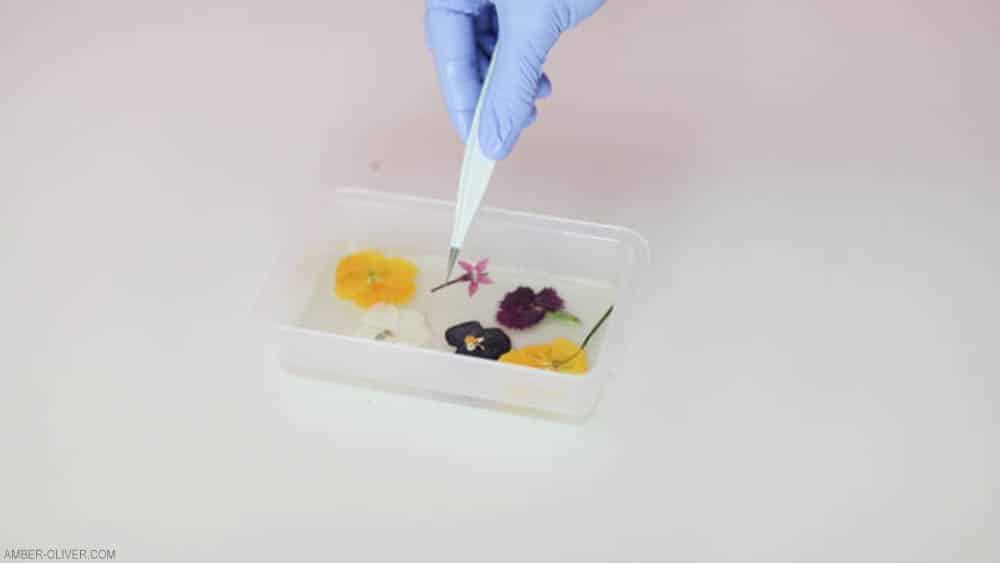
For this project, I used a few bright-colored blooms from my yard. I pressed them between wax paper in a book and left them to dry out. Depending on the type of flowers, the drying process can take a couple of weeks, but it’s worth the wait to get perfectly preserved, flat flowers.
Steps to Create Dried Flowers in Resin
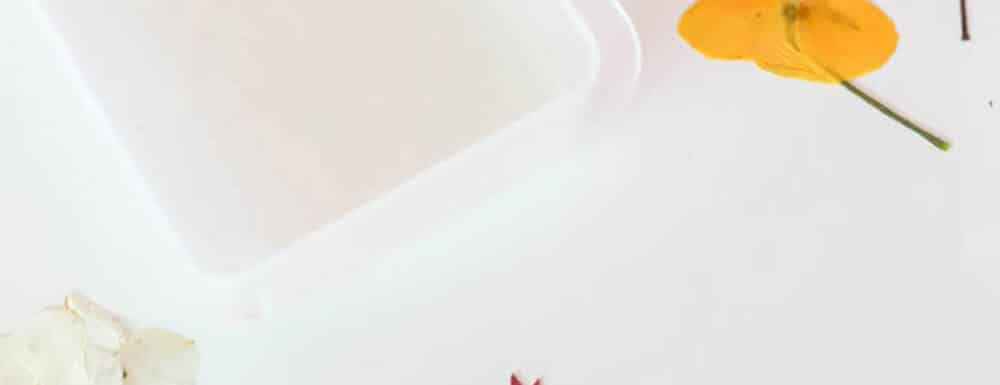
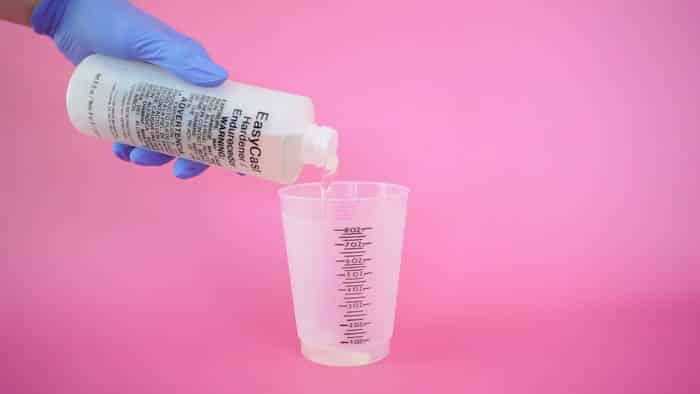
1. Prepare Your Resin
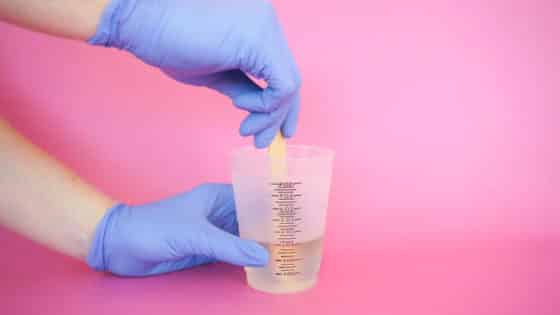
Start by preparing your EasyCast Clear Casting Epoxy. This is a multi-step process, so don’t start mixing until you are ready to do the whole project from beginning to end! Start by mixing equal parts of the Hardener and the Resin. Use measuring cups to ensure accuracy, and stir them together for 2 minutes. Be sure to scrape the bottom and sides of the cup gently to mix thoroughly.
2. Pour the First Layer of Resin
After mixing, pour from the first cup into a new, clean cup and mix for 1 more minute. Then, pour a small amount of resin into your mold. This first layer acts as the base for your flowers. Gently set the pressed flowers on top of the resin. This is where you can get creative with the arrangement. You can place them flat, or position them in a more 3D manner, depending on the shape of the flowers and the desired look.
Pro Tip: If you notice any air bubbles in the resin, you can remove them by gently blowing on the surface with a straw or using a heat gun. The heat will help the bubbles rise and pop, leaving a smooth surface.
3. Add Additional Resin Layers
Wait about 20 minutes after setting the flowers before adding another layer of resin on top. This helps the flowers stay in place and prevents them from moving or floating. Depending on the depth of your mold, you may need to add multiple layers of resin. Always allow each layer to settle and release air bubbles before pouring the next.
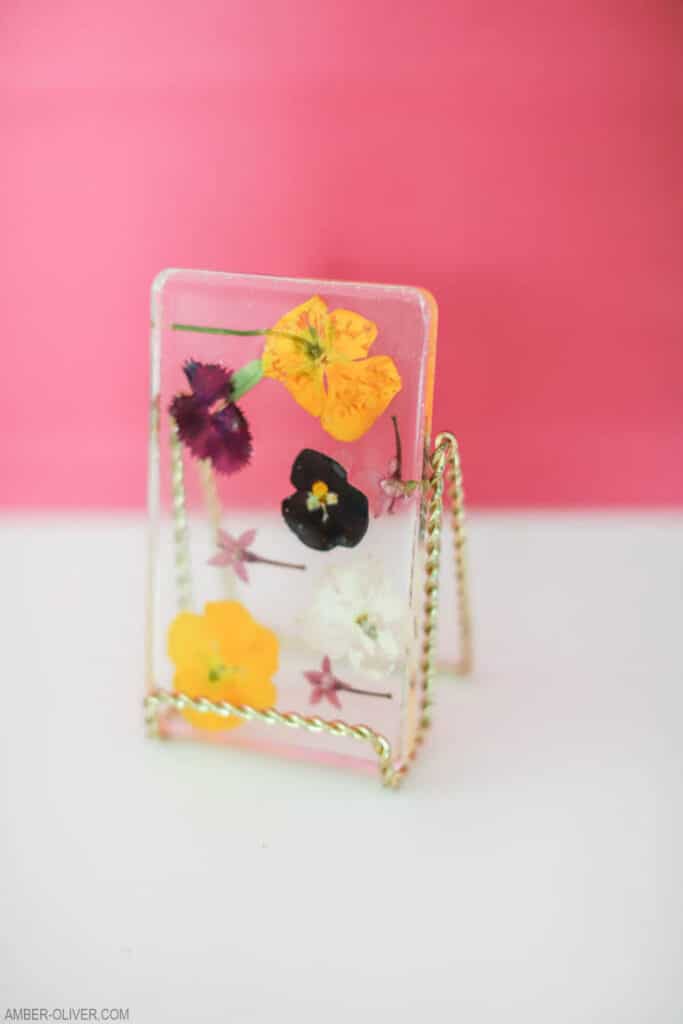
4. Cure and Demold
Once all the layers are poured and the flowers are fully encased in resin, allow the project to cure. Most resins require at least 24 hours to harden completely. After curing, gently remove your piece from the silicone mold. You should have a clear, beautiful resin piece with perfectly preserved flowers inside.
Pro Tip: Keep your curing resin in a dry place, away from direct sunlight, to prevent any unwanted discoloration or dust from settling on the surface.
Shop Resin Supplies
Looking for the best supplies for your resin projects? Check out the links below to find everything you need, from resin and molds to protective gear and tools. These resources will help you achieve the best results every time.


Exploring Different Methods of Drying Flowers
Before embedding flowers in resin, they must be dried properly. There are various techniques to achieve this, depending on the type of flowers you have and the look you’re going for:
- Air-Drying: A traditional method where flowers are hung upside down in a dry, well-ventilated space. This method is ideal for sturdy flowers like roses, but it can take a long time.
- Silica Gel Drying: For delicate flowers, silica gel is the best method to preserve their shape and color. It’s a faster process than air drying and works well for flowers like hibiscus or other delicate petals.
- Microwave Method: Using a microwave flower press, you can quickly dry flowers in just a few minutes. This is the easiest way to dry flat flowers, like daisies, that will be embedded in resin.
Pro Tip: For the best results, choose the drying method that suits the type of flowers you’re working with. This will help maintain the natural beauty and color of the flowers, which is crucial when creating resin art.
Creative Ideas for Resin Projects with Dried Flowers
Once you’ve mastered the basics of preserving flowers in resin, the possibilities are endless! Here are some creative ideas to inspire your next resin project:
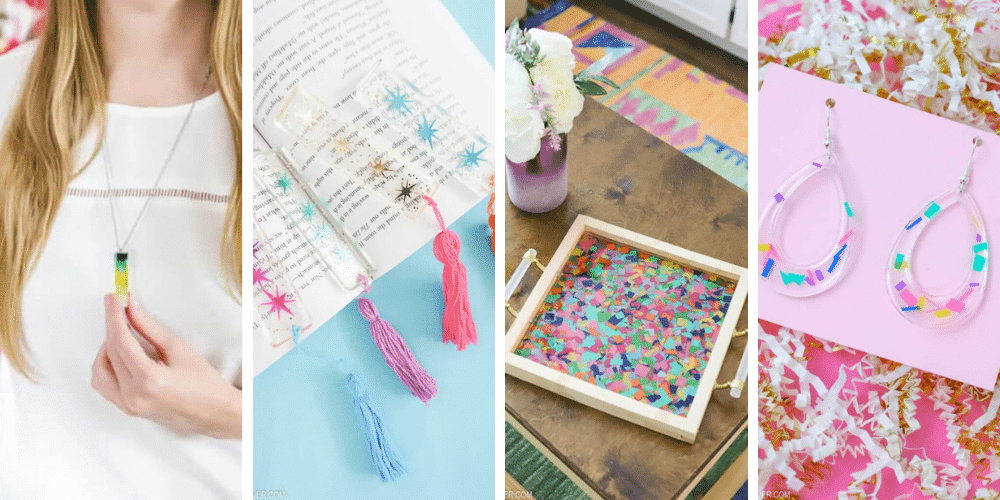
- Resin Jewelry: Create stunning resin jewelry by embedding small flowers in resin molds. You can make pendants, earrings, or bracelets that capture the natural beauty of your favorite blooms.
- Home Decor: Use larger molds to create decorative items like coasters, trays, or even wall art. Preserving flowers from special occasions, like weddings or anniversaries, can turn these items into cherished keepsakes.
- Gifts: Handmade resin pieces make thoughtful and personalized gifts. Consider using flowers from a friend’s wedding bouquet or special event to create a unique and sentimental present.
Tips for Achieving the Best Results in Your Resin Projects
Working with resin can be a bit tricky, but with a few tips, you can achieve professional-looking results:
- Use Equal Parts of Hardener and Resin: Accurate measuring is key to a successful resin project. Unequal parts can lead to a resin that doesn’t cure properly.
- Work in a Dust-Free Environment: Keep your work area clean and free of dust. This will prevent any particles from getting trapped in the resin as it cures.
- Choose the Right Molds: Silicone molds are the best choice for resin projects because they are flexible and make it easy to remove the finished piece.
- Avoid Direct Sunlight: When drying or curing resin, avoid exposing it to direct sunlight, as this can cause yellowing over time.
- Experiment with Different Flowers: Try using different types of flowers to see which ones work best in resin. Some flowers may lose color or become brittle, so it’s worth experimenting to find your favorites.
Resin art is a wonderful way to preserve the natural beauty of flowers and create lasting, beautiful things. Whether you’re working with real dried flowers, artificial flowers, or even flower petals, the process of embedding them in resin opens up a world of creative possibilities. From jewelry to home decor, resin allows you to transform organic materials into art that can be cherished for years to come.
DIY Dried Flowers in Resin

Wondering what to do with pressed flowers? Learn how to preserved dried flowers in resin!
Instructions
- Start by preparing your EasyCast Clear Casting Epoxy. This is a multi-step process, so don’t start mixing until you are ready to do the whole project from beginning to end! Start by mixing equal parts of the Hardener and the Resin.
- Start by preparing your EasyCast Clear Casting Epoxy. This is a multi-step process so don’t start mixing until you are ready to do the whole project from the beginning to end! Start by mixing EQUAL parts of the Hardener and the Resin.

- Stir them together for 2 minutes! Be sure to scrap the bottom and sides of the cup gently.

- After 2 minutes, pour from the first cup to a new clean cup and mix for 1 more minute.
- AFter the resin is mixed, pour a small amount in the mold.
- Gently set the pressed flowers on top of the resin.

- Wait about 20 minutes after setting the flowers to add another layer of resin on top. This helps them not move!
- If bubbles appear on the surface of your resin you can blow on it with a straw or use a lighter to pop them.
- After you've allowed enough time for them to set, you can remove them from the molds!
RESIN ARCHIVES
View our collection of Resin projects!
I hope this project inspires you to try dried flowers in resin for your next DIY project! If you’re looking for more resin projects, please visit our Resin Archives!

Leave a Reply